// cord & knot
Paracord
Functional objects. Deliberate color. Structured improvisation.
// cord & knot
Functional objects. Deliberate color. Structured improvisation.
Paracord work started as a practical curiosity and became something more considered. What began as making functional items for dogs, collars that could hold up and bracelets that looked intentional, turned into a sustained exploration of how constraint drives creativity. Two strands. One knot. Endless variation.
The appeal is immediate and honest: you know within a few inches whether a color pairing works. There's no rendering, no preview, no simulation. You hold the cords together and your eyes tell you the truth. For someone who struggles to visualize color combinations mentally, this is the right medium. The work reveals itself in real time.
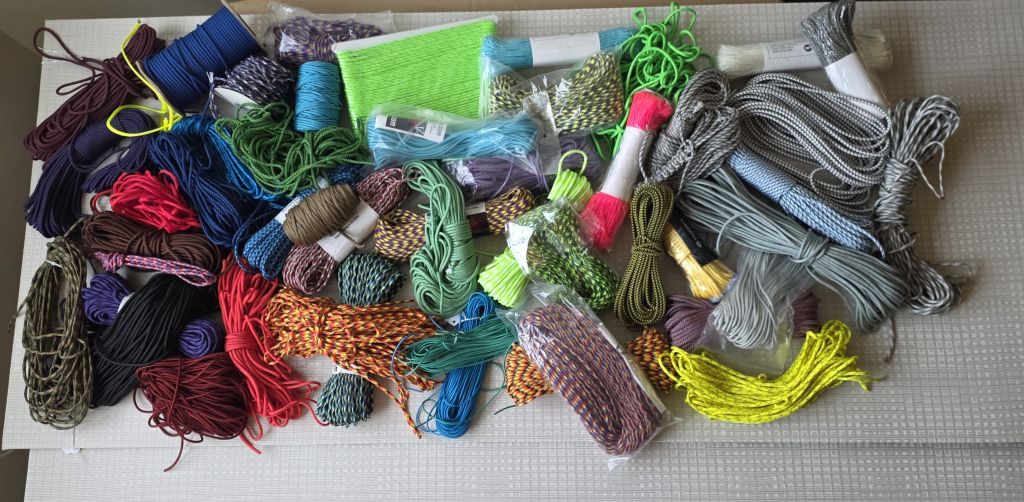
This page documents a body of paracord work: what was made, what patterns became favorites and what the process taught along the way.
Paracord, originally parachute suspension cord, is a lightweight nylon kernmantle rope developed for military use. Its inner core of twisted strands gives it tensile strength far beyond its diameter, while the woven outer sheath provides durability and takes color exceptionally well. Type 550, the most common, holds 550 pounds of static load and comes in hundreds of solid colors and multi-color patterns.
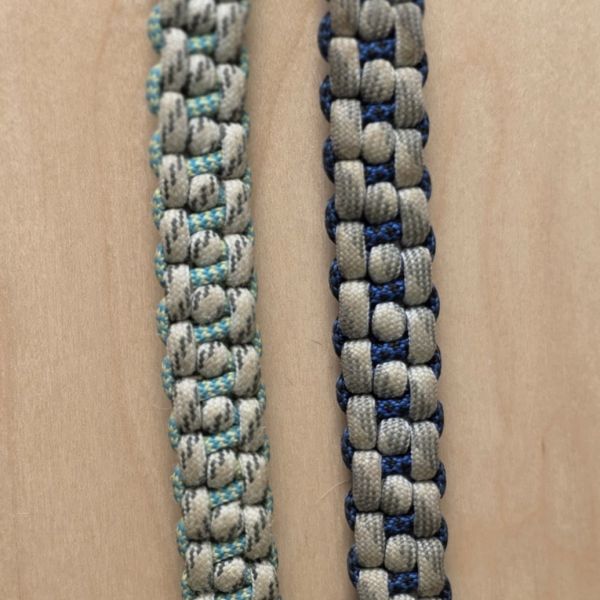
The design space is deceptively large. From two strands, a maker can produce flat weaves, rounded profiles, spiral structures, chain-link patterns, serpentine textures and layered king cobra builds, each with a distinct visual and tactile identity. Color selection multiplies the possibilities: the same knot in black and yellow reads nothing like the same knot in burgundy and fire stripe. Pattern choice and color choice are inseparable decisions. Getting both right in the same piece is the challenge that keeps the work interesting.
For a deeper look at the history and origins of paracord, Paracord Planet has a solid illustrated history worth reading. Their supply selection and video tutorials are worth bookmarking while you're there.
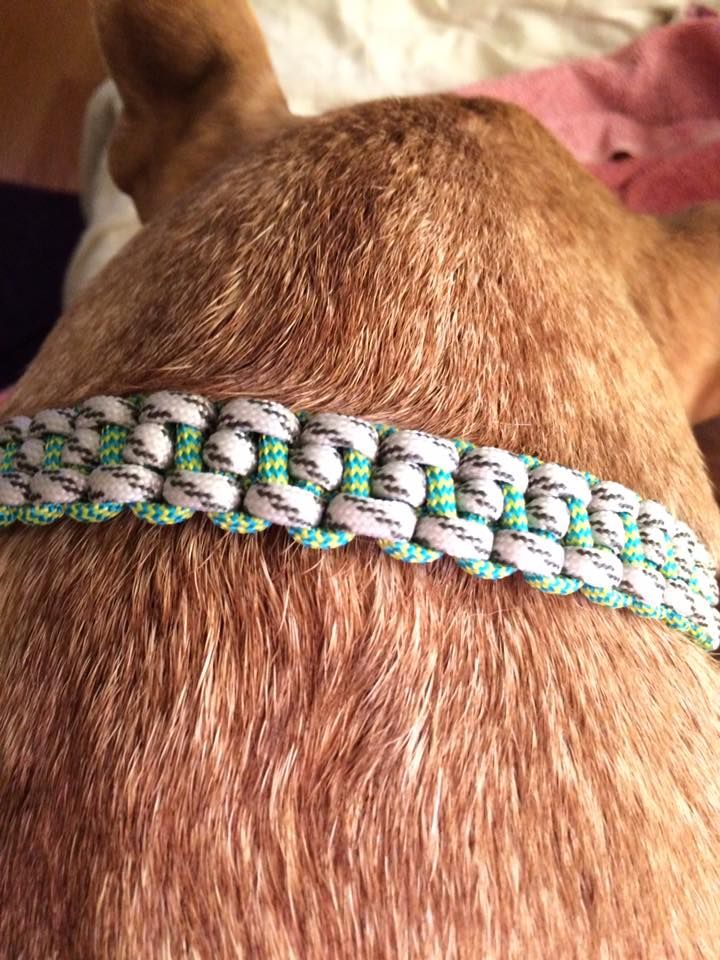
Dog collars were the first serious application. The scale demands precision: a collar has to fit a specific neck, close cleanly and hold hardware that takes real load. Getting the length right while maintaining consistent tension through the weave is harder than it sounds. Early collars were learning objects. Later ones became gifts.
A few patterns stood out as great designs for the dog collars, tight and beautiful. The scalloped edge and raised loop texture gave collars a visual presence that plain weaves couldn't match. Color choices for collars tend toward the bold: the piece lives against fur, often at distance, and needs to read as intentional from across a room.
Of the collars made, roughly half were worn, built for a specific dog, sized to fit and put to actual use. The others were pattern and color experiments that never found a neck. Both kinds matter. The worn ones proved the work was functional. The unworn ones proved the work was exploratory. A body of craft needs both.
Paracord does not stretch, just like other collars, but even more so, by design. Paracord won't tighten, but it won't release either. If a collar catches on a crate edge, fence corner or any protrusion, the dog will pull away instinctively. The cord will not tear, will not stretch and will not give. The buckle may eventually fail, and a dog may slip out depending on fit, but neither outcome is guaranteed or quick.
The practical guidance: remove your dog's collar when he/she is alone, crated or in any space where it could snag. This applies to any non-breakaway collar, not just paracord. Horses have breakaway halters for the exact same reason. A calm dog that wears a collar safely is a different situation from an anxious dog, a reactive rescue dog or any dog left unsupervised in a space with edges and gaps.
These collars were never built for training or leash work. The intended purpose was looking cool and unique while providing means for identification tags (name, rabies & license #). For walks, training and anything involving leash pressure, a martingale, slip lead or harness is the right tool for the job.
Paracord martingale designs exist, though I have never tried to use them or create one. It is something for a future build perhaps. Knowing what a collar is for before putting it on the animal is the whole point.
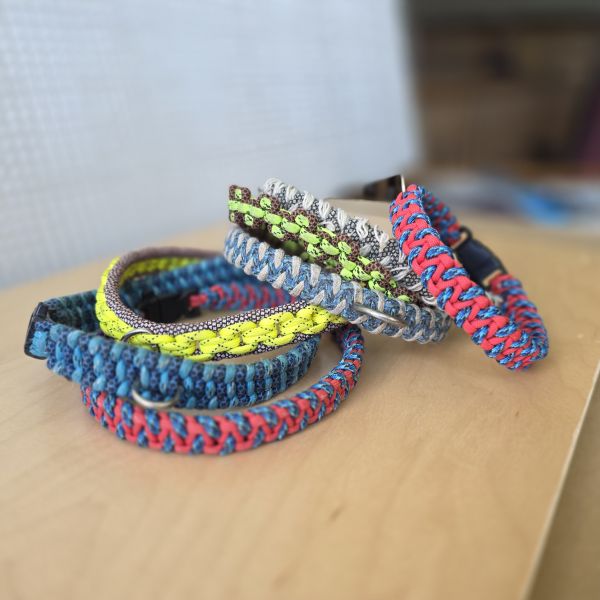
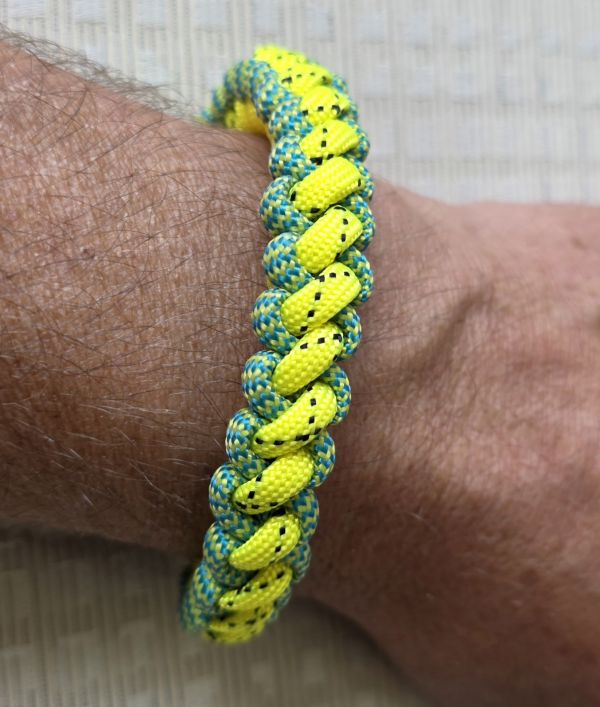
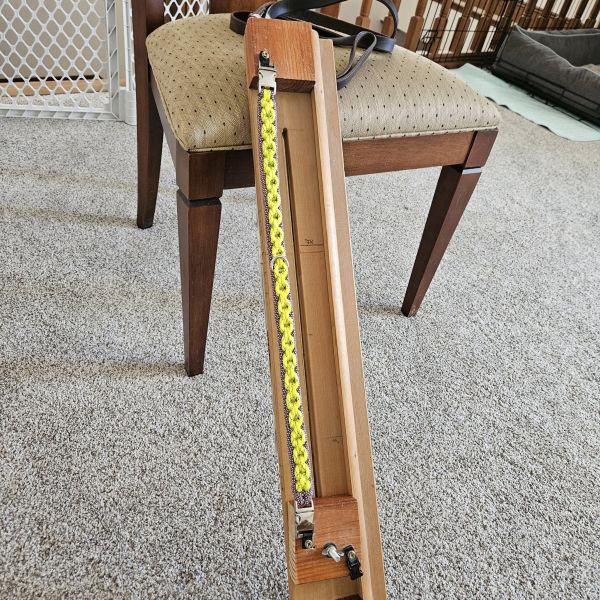
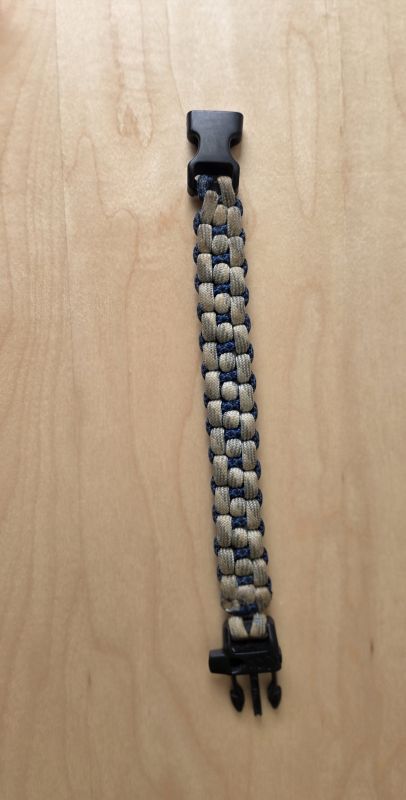
Bracelets operate at a smaller scale with tighter tolerances. The weave has to be even from the first knot to the last; inconsistency that reads as charming on a long collar reads as sloppy on a three-inch bracelet. This made bracelets useful calibration tools: if a pattern held up at bracelet scale, it was genuinely mastered.
The rounded box weave in particular revealed its self-maintaining structural quality at bracelet length. Even after handling, it held its profile. That's not a given with paracord; cheaper cord relaxes and flattens. Material quality matters as much as technique.
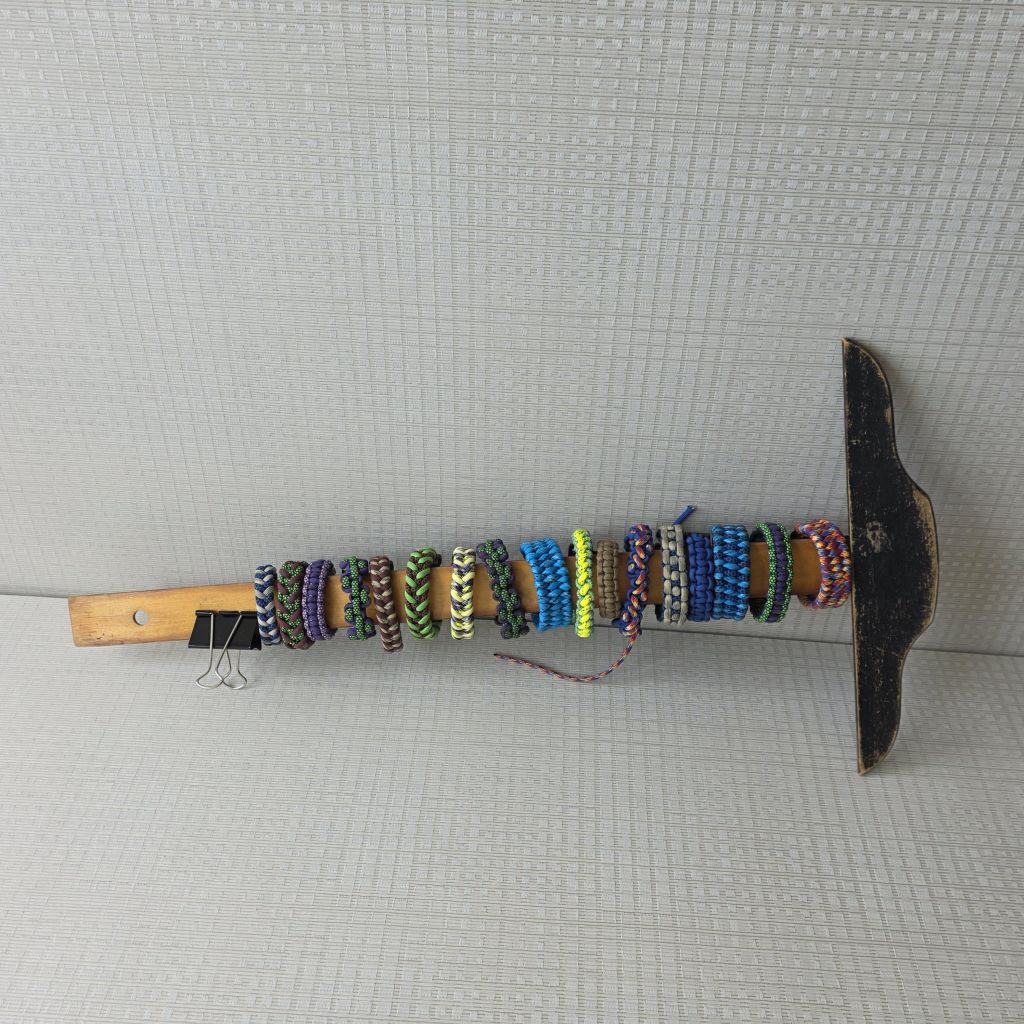
The display rack in the photos is a T-square, a precision mechanical drawing tool from the era before CAD, inherited from my father's drafting days. It turns out to be the right diameter for hanging bracelets. Old tools find new purposes.
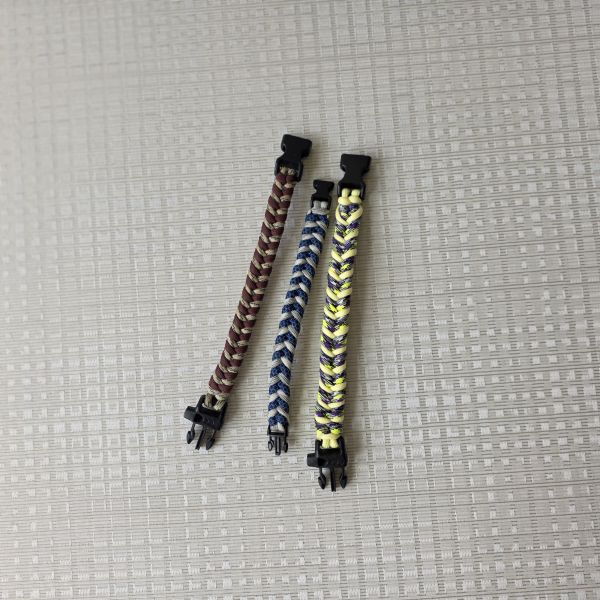

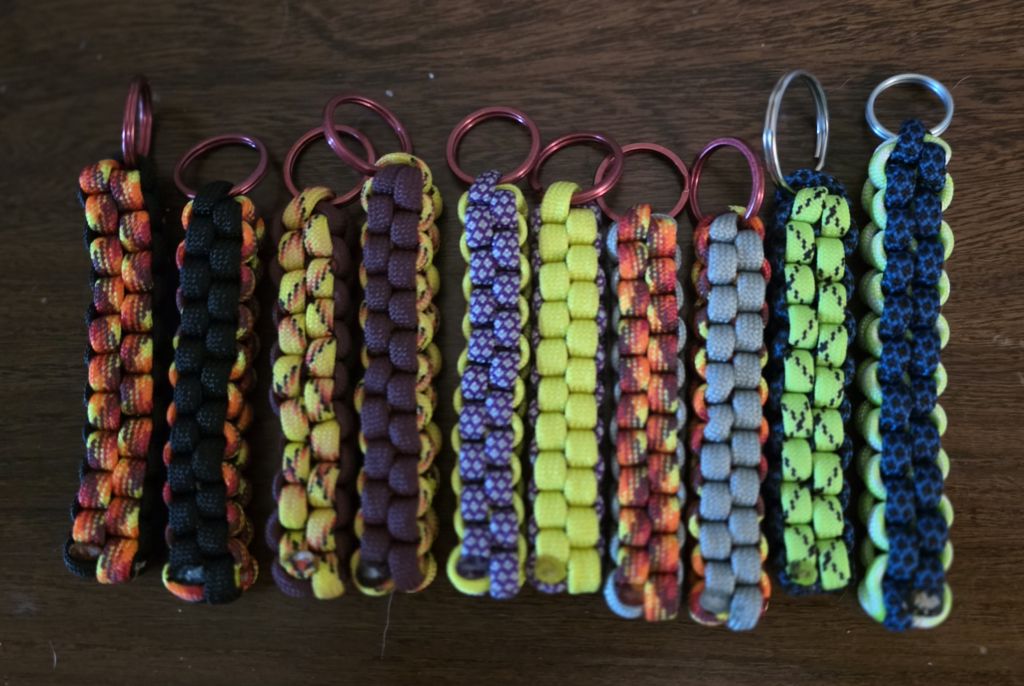
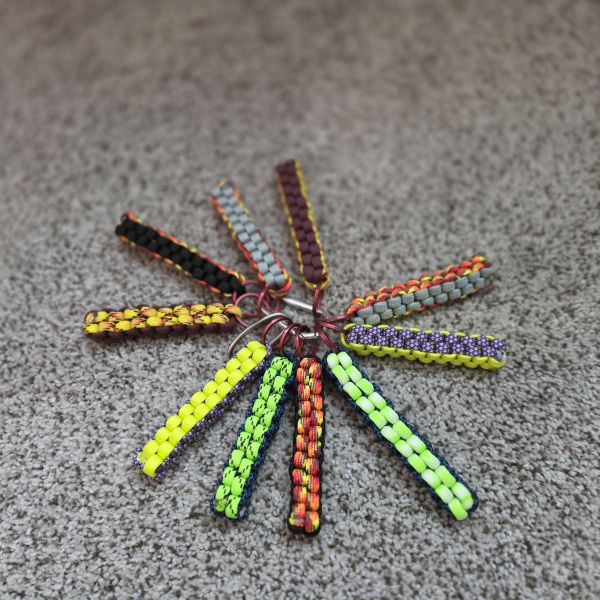
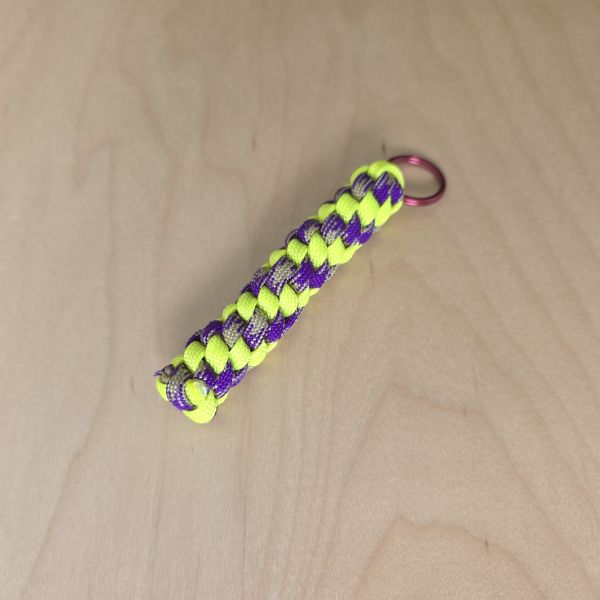
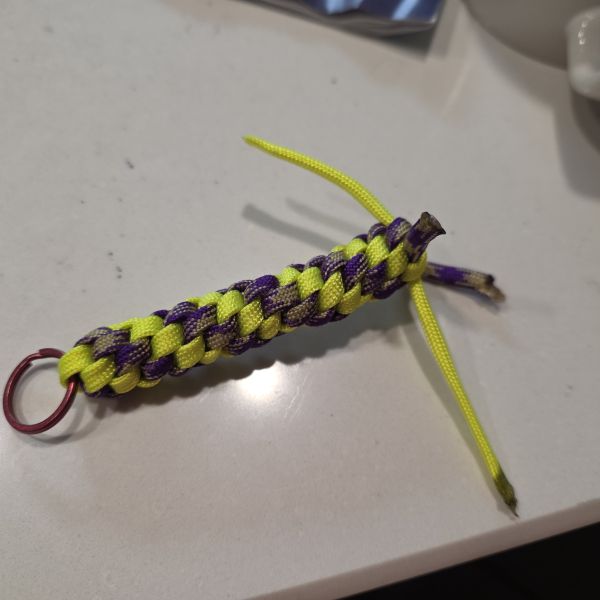
Keychains are an easy entry point for anyone and useful to everyone. From simple designs to more specific patterns, so many options. And quick to make since they are typically small. They also tend to generate a reaction. When someone sees a handmade keychain or a dog collar, the comment that comes up most often is some version of "you should sell these." It's a real option; people do exactly that at farmer's markets and online. It can be a business, especially for someone who enjoys that side of things. For me, creating something that can be used is more rewarding then trying to sell them.
For the 10 keychains shown, my purpose was as a set as a thank you gift to a doctor's office staff who were genuinely lovely people, always professional and great at their jobs. Homemade and unique way of saying thanks.
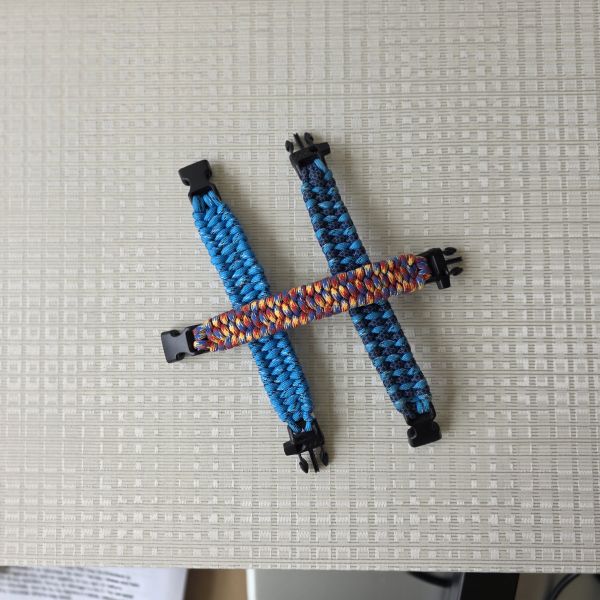
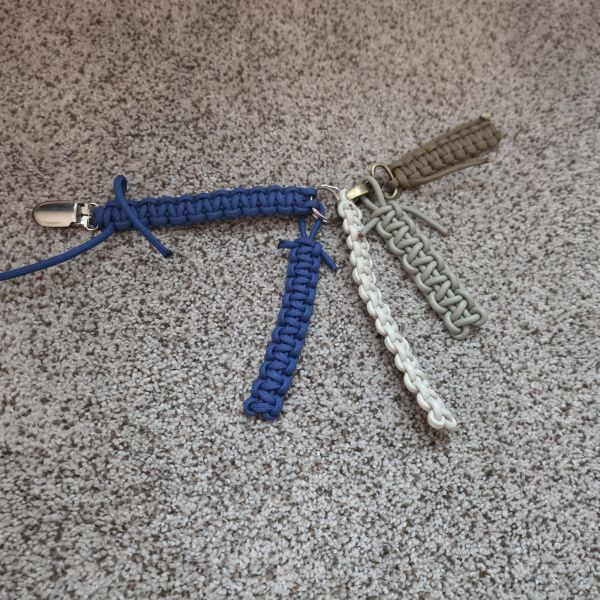
Keychains also work well as a testing format. Short length, low cord cost, fast to build. Two pieces used old mouse wire instead of paracord, the same cobra knot pattern in a completely different material. A navy piece tested an alligator clip connection, which opens up attachment options a standard key ring can't match. Small format, one variable changed per build. Keychains, zipper pulls or just random component hanging off of something, so many options.
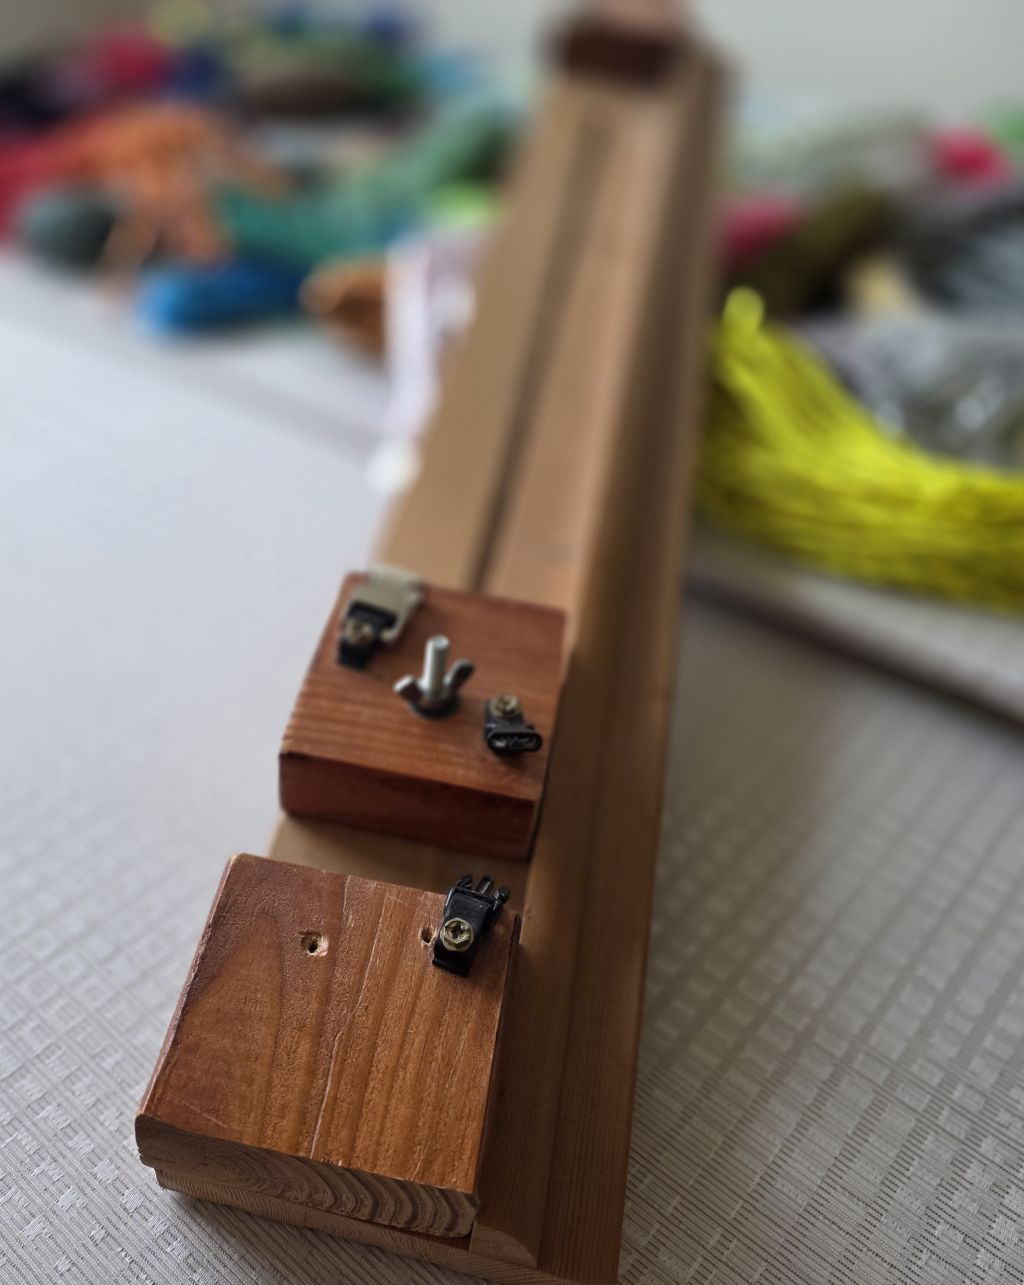
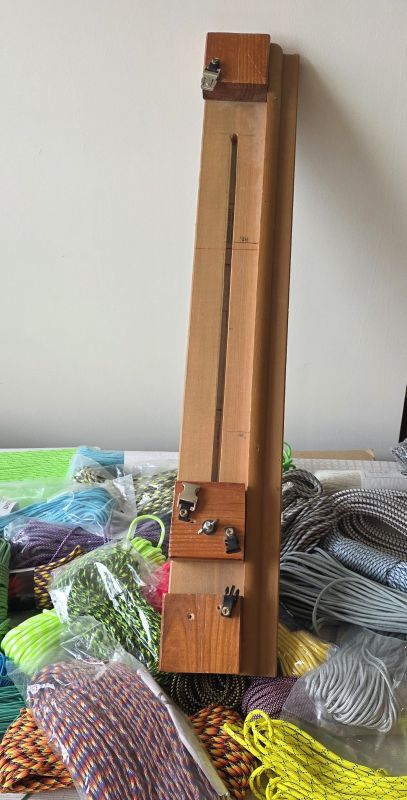
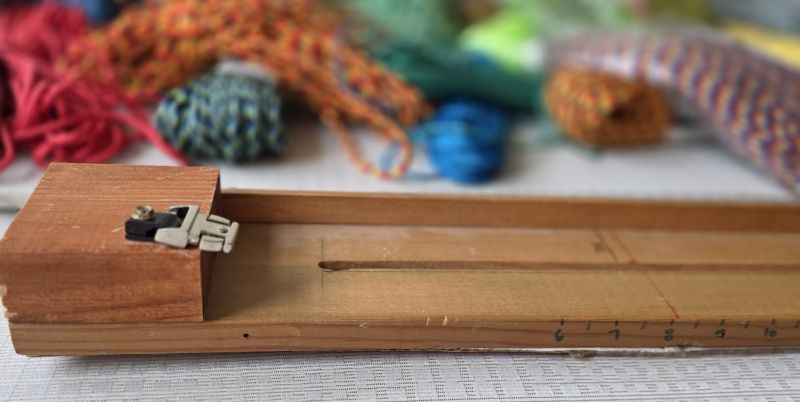
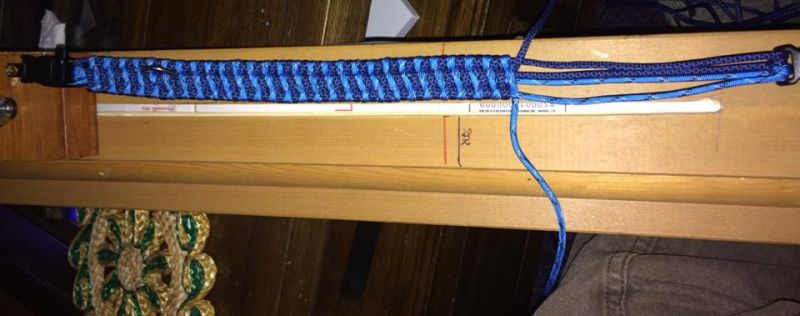
The jig came after the first few attempts at collars and bracelets made clear that working freehand was a constant fight. Without it, the buckles shift, the center cord twists or goes slack and every single row requires stopping to realign the whole piece by hand. It can be done, but the maker spends more time managing the structure than building it. The jig locks the width in place, keeps the main cord taut between the two buckles and eliminates most of that adjustment. Tightening each stitch is easier too, since the piece is held secure. It makes a significant difference.
After a few builds, a lot of video research and a look at what was available commercially, building one made more sense than buying. The commercial options available at the time didn't extend to the length needed for larger dog collars. A custom build meant flexibility: this jig handles anything from five inches to thirty-two inches.
The main board came from a door jamb pulled during a home remodeling project. That gave a built-in straight edge along the side of the bottom plate without having to add one. The two holding blocks reference that edge to stay square to each other when repositioned. Cable lock clips from a local hardware store hold the buckles in place. The original setup had a small buckle on one end and a larger on the other to handle both collar and bracelet scale without swapping hardware. When metal buckles came in for the dog collar builds, removing the large plastic ones and attaching the new ones was a quick change.
One known issue: the bolt on the floating block doesn't sit flush. It protrudes about a quarter inch and would snag on anything when the jig is moved. A piece of cardboard covers the back. It's a hack, it works and it cost nothing. Some problems get solved that way.
The jig was also always something more than a personal tool. If other people wanted to get into paracord work, helping them build one of their own would be a straightforward first project. The design is simple enough that replicating it is part of the point.
Pattern credits to Bored Paracord, as far as I know
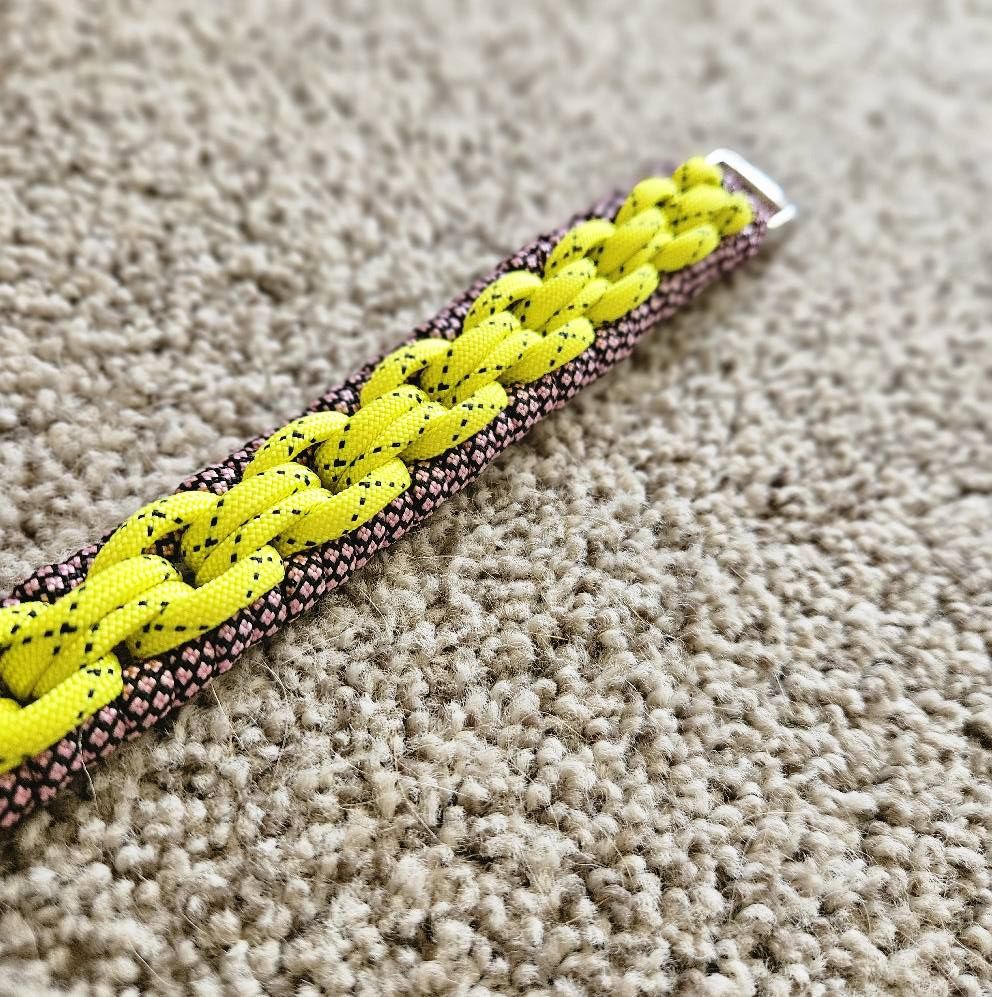
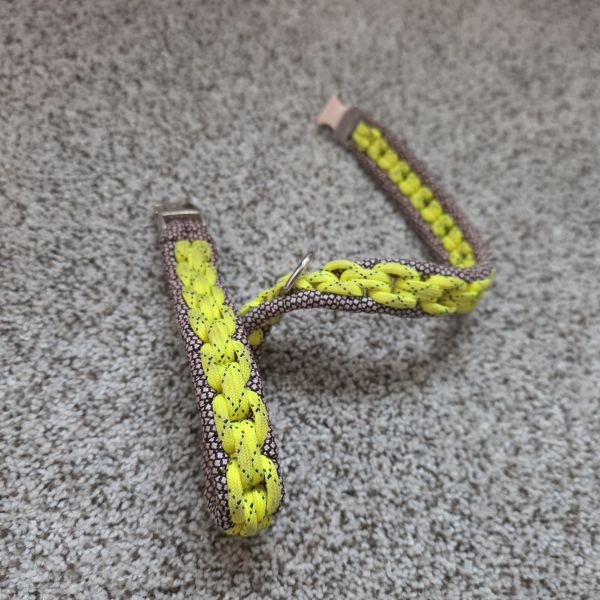
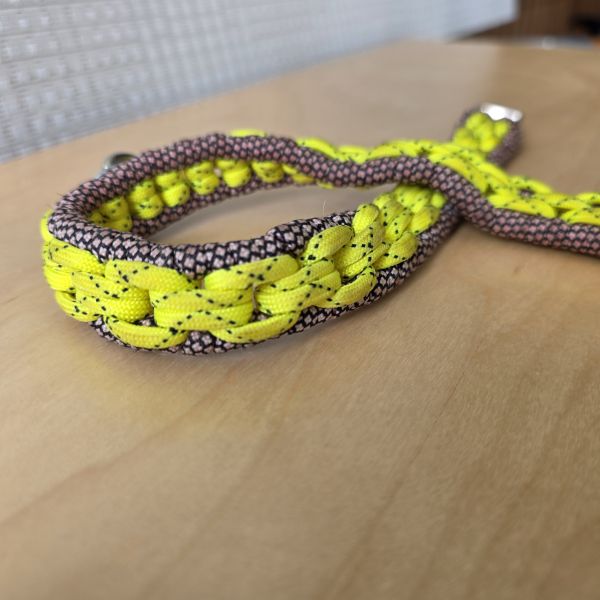
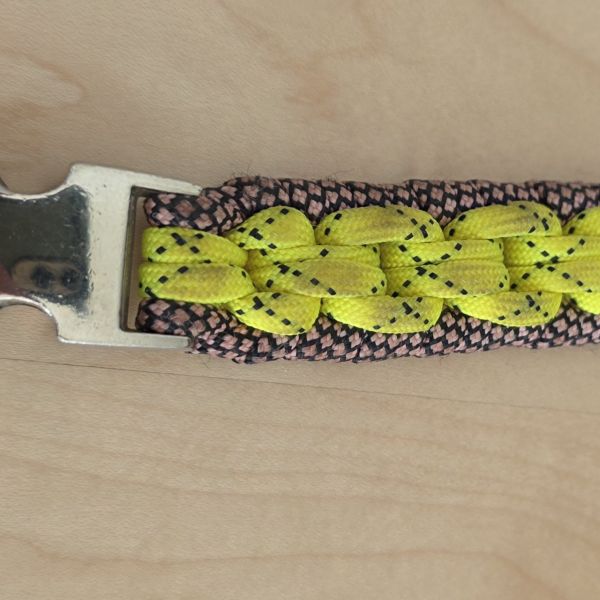
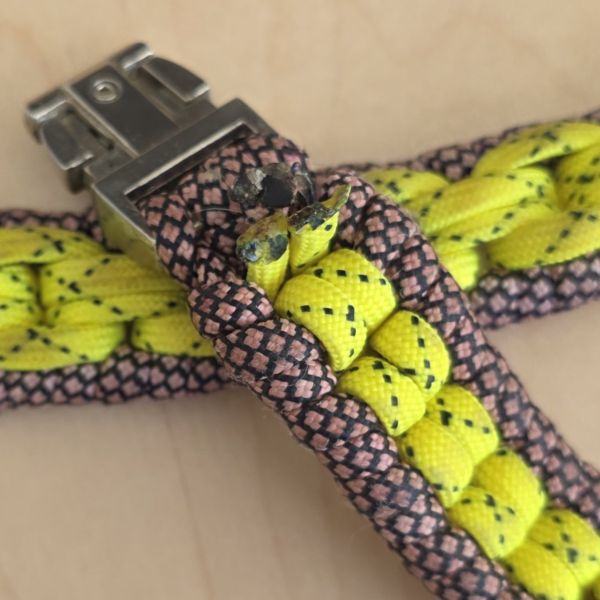
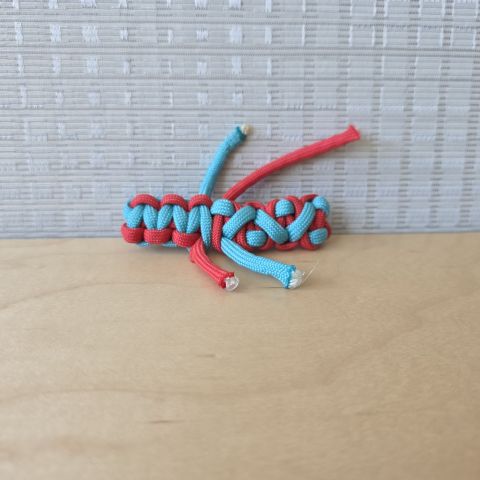
The 'binary code', as named by Bored Paracord, was one of the first variant designs I tried. Learning from YouTube videos, this one was fun to do once I got used to the pattern. I really like the end result and the name choice was apropos to my own verbal liking.
The foundation: two strands, one repeating pattern and a flat profile that stacks cleanly on itself. The pattern is honest; there is nowhere for sloppy tension to hide. Consistent pressure through every knot is what separates a clean finished product from a mediocre one. This is one of many patterns that has a much different look on the other side. In this case, quite a varied result, which could be something someone really likes visually.
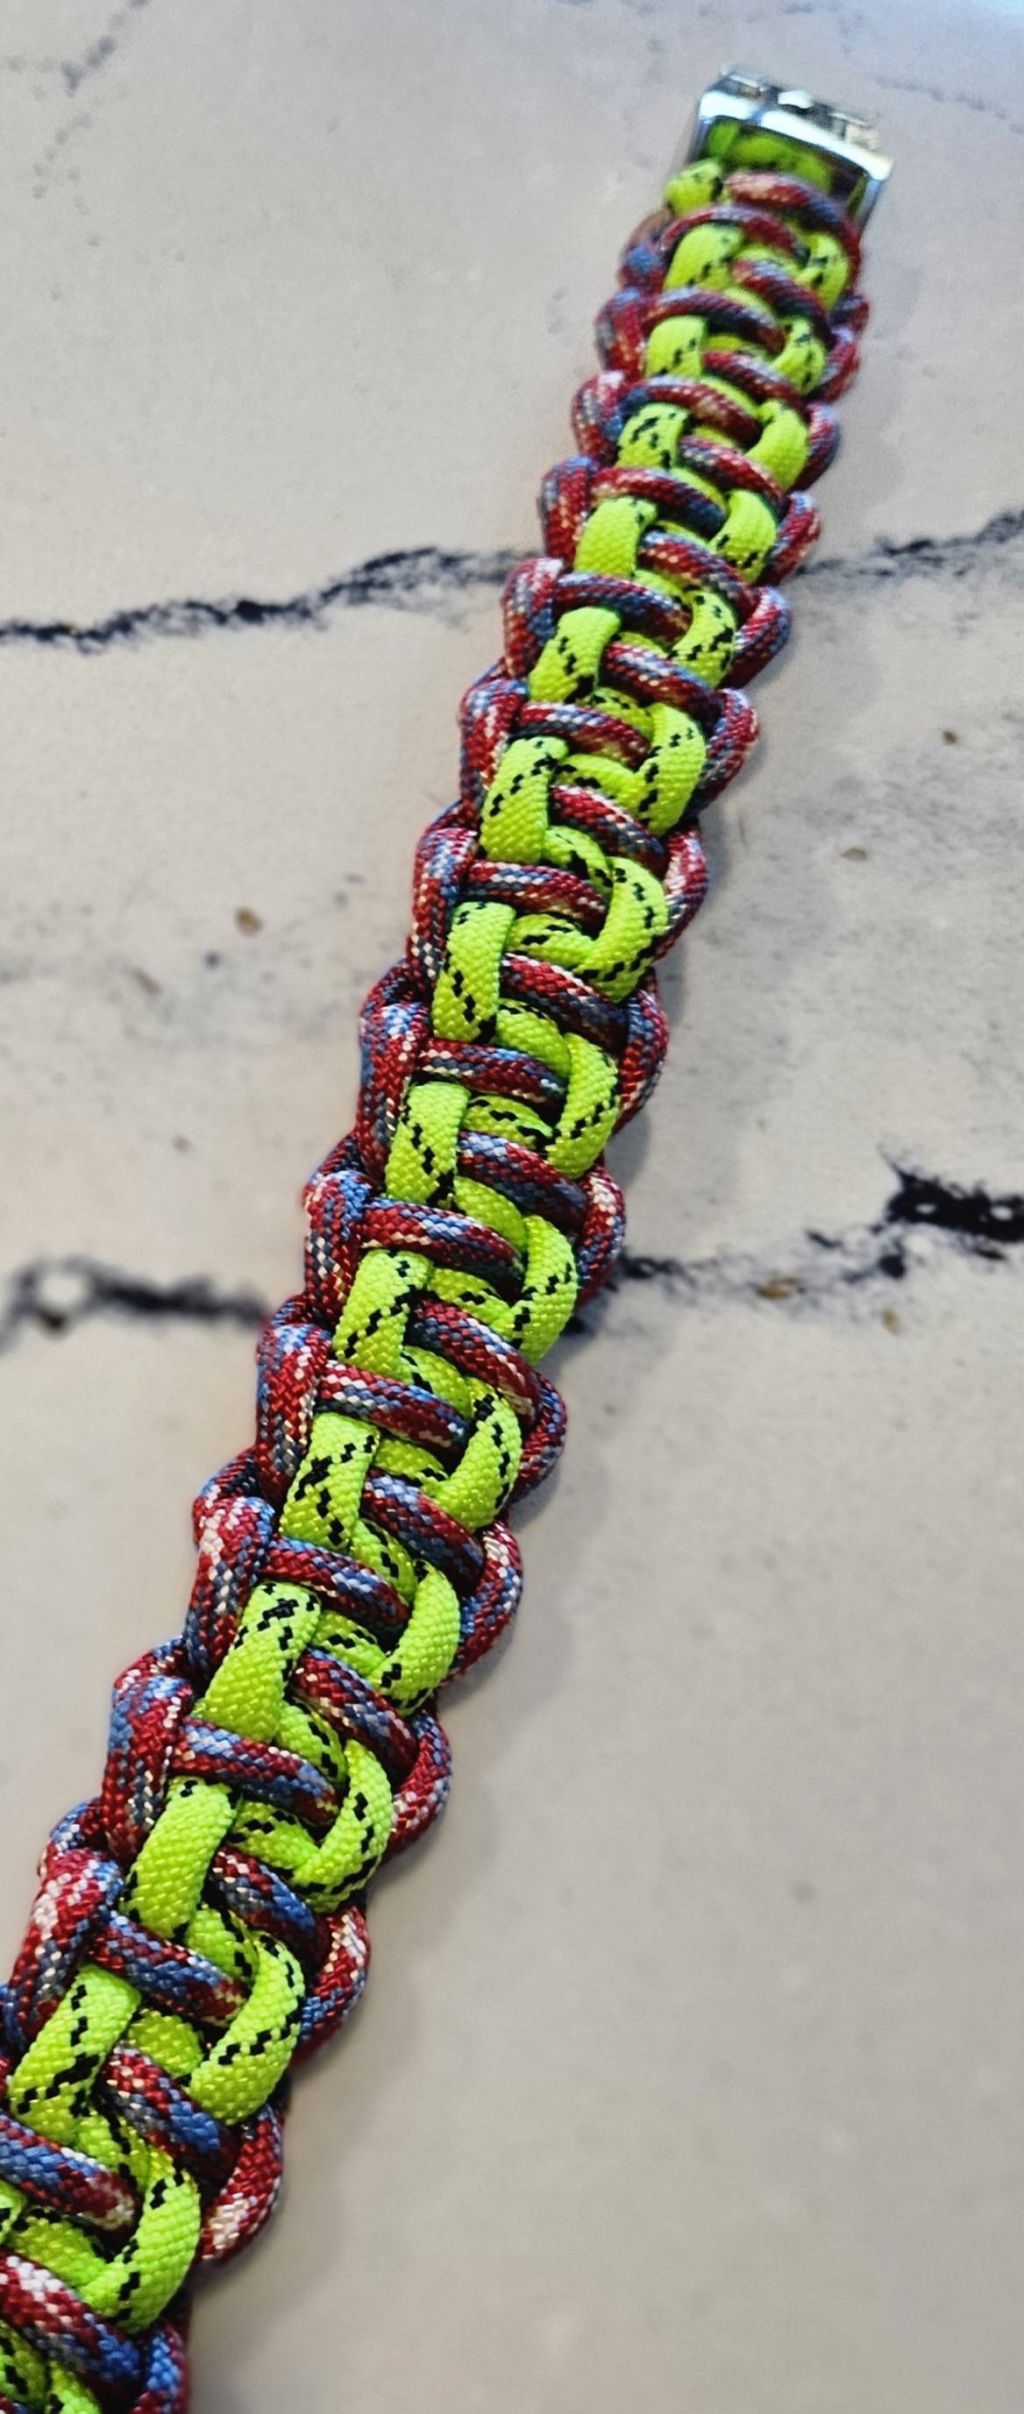
Color contrast does the design work here. The same knot structure with different cord pairings produces results that read as completely different objects. Bold complementary pairs, yellow and black or purple and neon, push hard. Tonal pairings like burgundy and fire stripe pull the eye inward. Neither is wrong. Both are choices. That being said, both examples shown were very early creations and I had less variety of cord colors back in 2017.
I feel i will revisit this pattern in the near future and make use of some of the more bold colors I have.
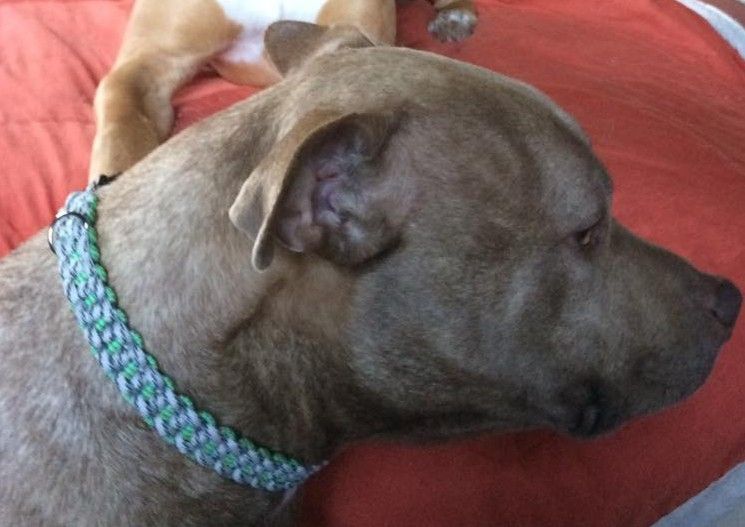
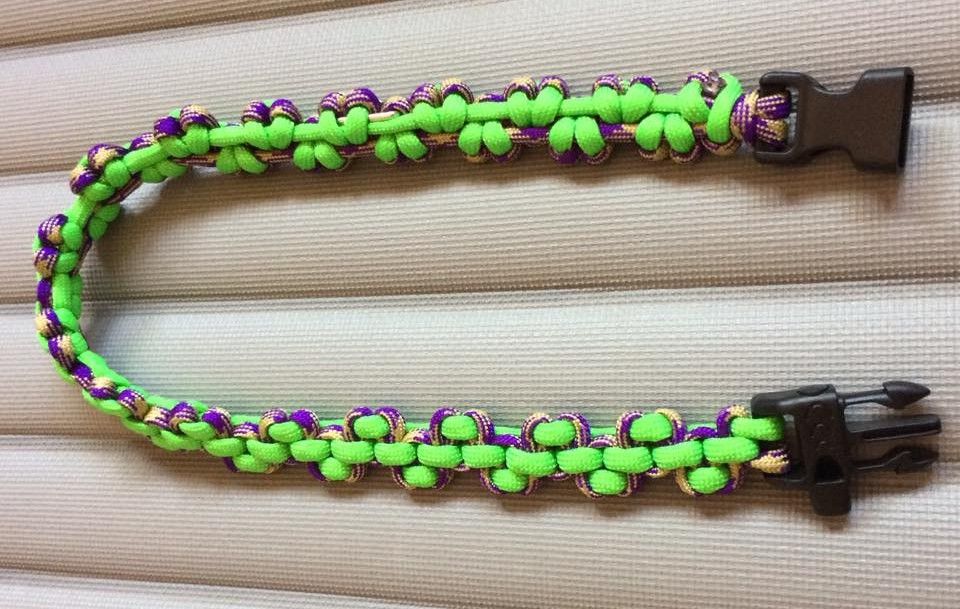
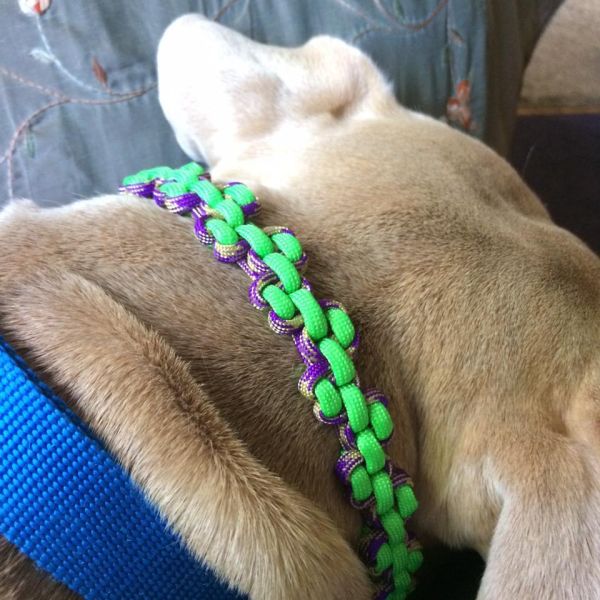
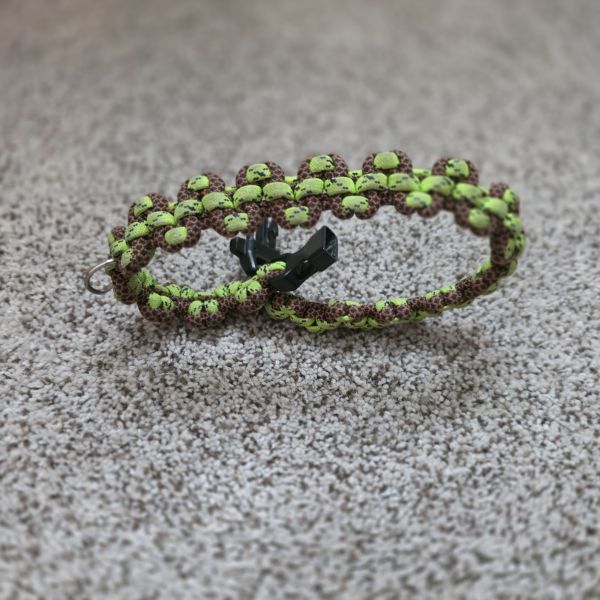
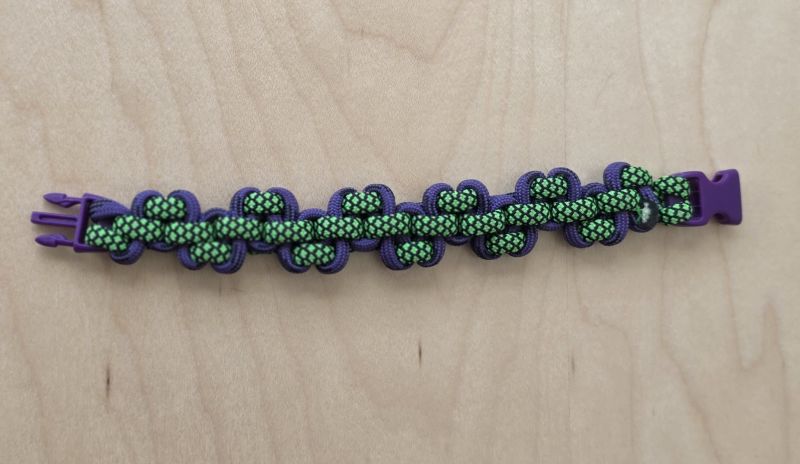
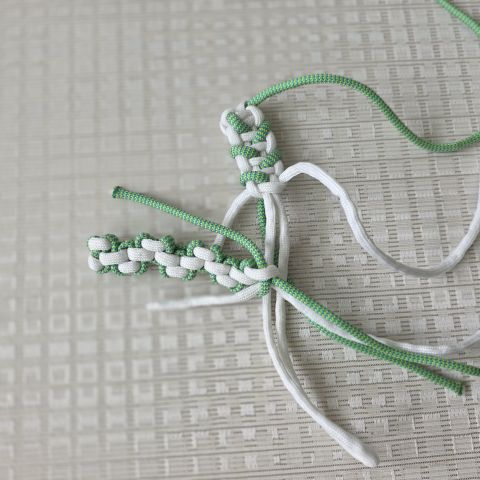
Also known as: serpent knot, scalloped edge weave
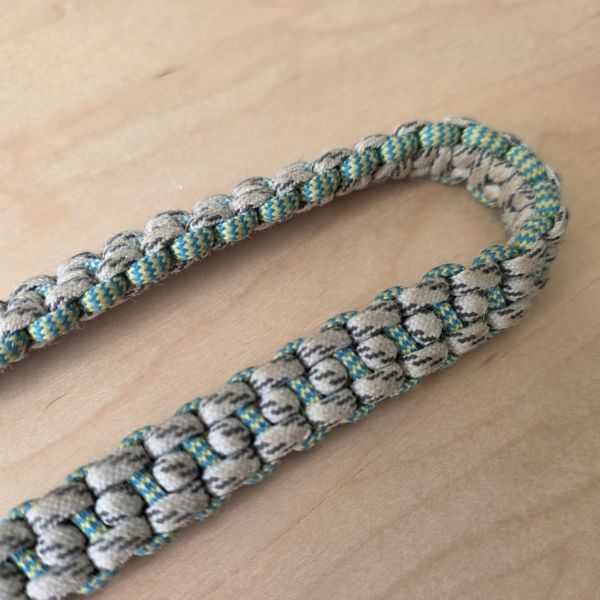
The serpent is the most visually complex of the three and one of the most striking results achievable with two strands. The outer cord forms raised scalloped loops along both edges while the inner cord creates a dense diamond mesh body. The combination reads as lacework or chainmail depending on scale and color. The movement obtained by the weave makes it stand out and be admired by all.
What makes it a favorite is the interplay between structure and edge. The mesh body gives it mass; the looped border gives it movement. At collar scale, the pattern has enough real estate to fully develop. The purple and neon green version, made years ago, still holds its form and remains the clearest demonstration of what this pattern can do when the cord quality is right.
Finishing this pattern cleanly requires more planning than the binary. The edge loops have to be consistent from first to last or the irregularity compounds visually. Stiffer cord helps: it holds the loop shape rather than collapsing under its own weight.
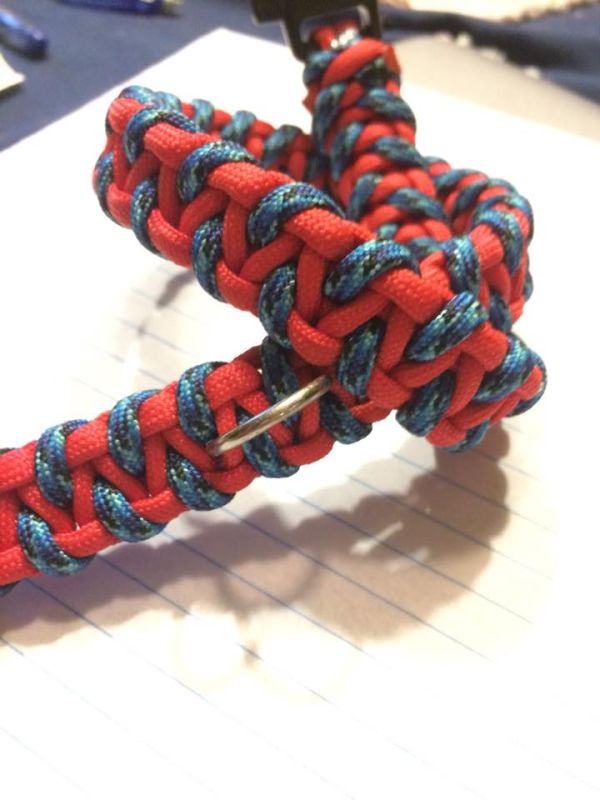
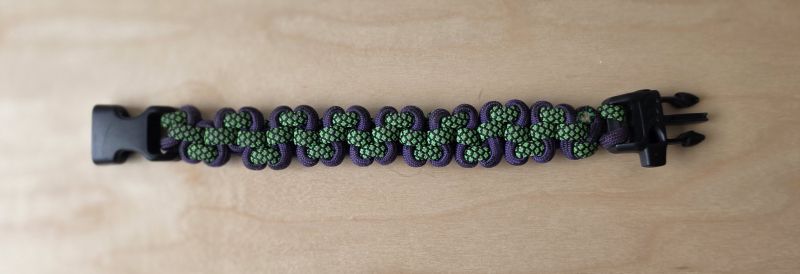
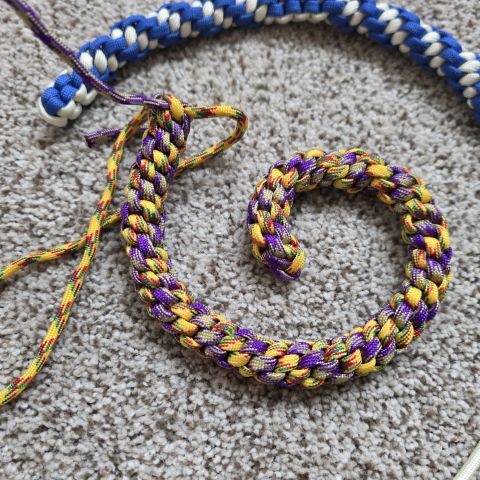
Also known as: chain sinnet, interlocking loop pattern
The chain link is tougher to execute as it has an unforgiving finish without changing the pattern. Unlike knotted patterns, the chain link holds itself through interlocking loops with no knot anchoring it, which means the structure relies entirely on tension and geometry. Pull one loop wrong and the whole section loosens.
The payoff is a pattern that looks genuinely different from conventional paracord work. Where the binary and serpent read as 'woven', the chain link reads as linked; the visual language of metal chain translated into cord. That distinction is what makes it worth the difficulty.
Finishing is the unsolved problem. Melting doesn't work cleanly on a loop-based structure. The current approach is careful mechanical finishing, the exact method still being refined. The right solution will probably be invisible when it works. In the collar shown, because it was worn and taken off daily, the constant movement caused the finished area to break away multiple times. With a tie or knot to finish it, the creator is melting the cord into itself. This usually works, just not in very active locations of the creation, in this case, the collar buckle area.
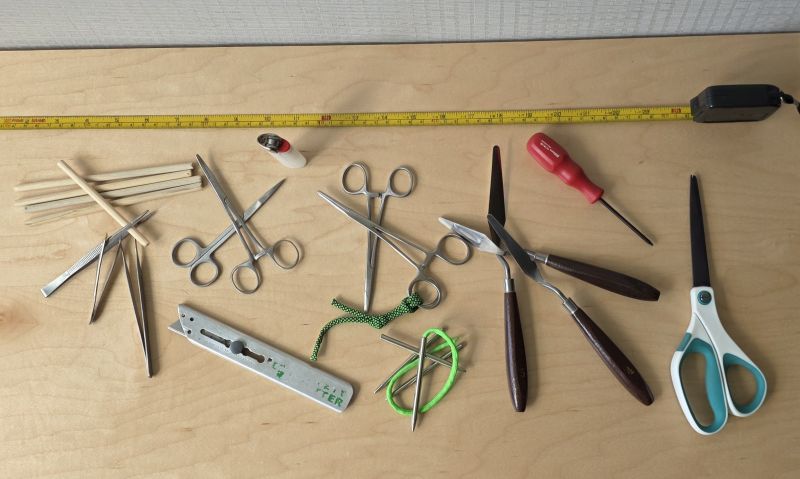
The core tool list is short. A lighter for heat-finishing cord ends. A pair of sharp scissors or snips. Blunt needles for threading ends through tight weaves. Hemostats or locking pliers for pulling cord through close-knotted sections where fingers can't reach. That covers most builds.
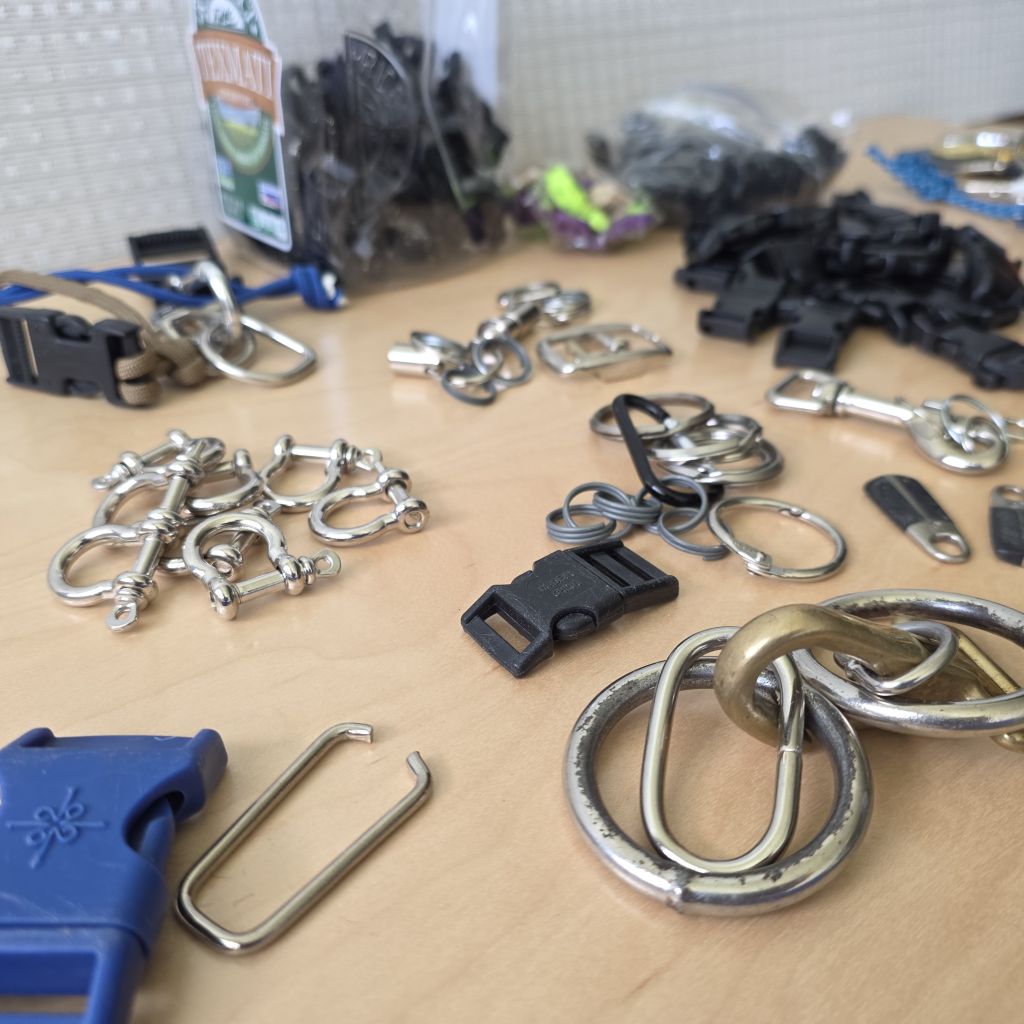
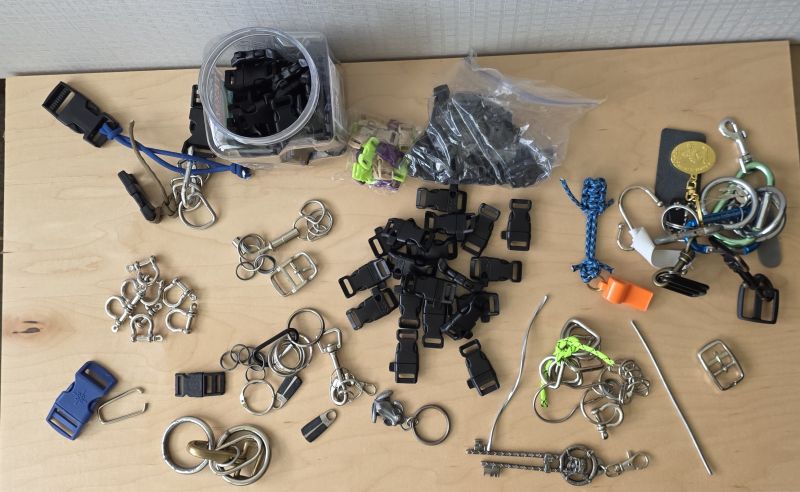
Hardware is its own category. Buckles come in plastic and metal, side-release and center-bar, small and large. The right buckle for a bracelet is not the right buckle for a working dog collar. Building a range of sizes and materials over time means options are available before a project starts rather than after. Swivel clips, D-rings, lobster clasps and O-rings each solve different attachment problems and are worth keeping on hand.
In Moondog fashion, every clip or fastener that came through the door got added to the box. Recycled leashes, old collars, purse straps, chandelier chain, zipper pulls, random loops and bangles. None of it gets thrown away until it's been evaluated. One never knows what might fit a design that doesn't exist yet. The box of salvaged hardware has solved more than one problem that a trip to the hardware store couldn't.
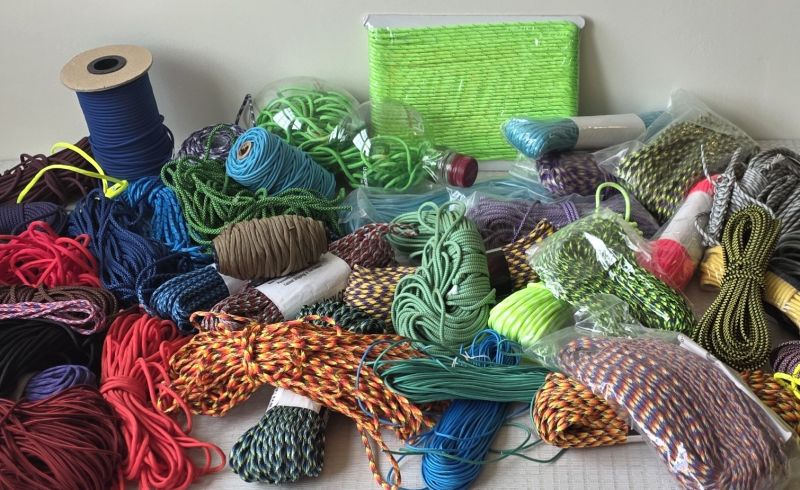
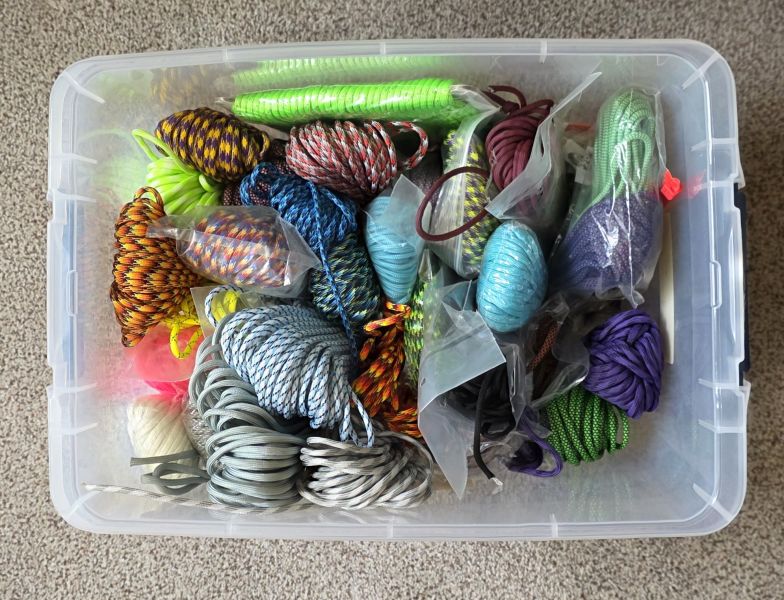
Cord selection is the most consequential supply decision. Type 550 paracord is the standard, but the range within that type is wide: stiff versus soft, solid versus multi-color, domestic versus imported. Quality variation between suppliers is real and affects how the finished piece looks and holds up. Buy a small amount of an unfamiliar cord before committing to a full project run.
For me, visualizing color combinations is something my brain cannot create. From wall color, to pillow matching couch colors, I cannot honestly see this in my mind and therefore cannot ever say 'that color will go good with [item]'. So mental visualization of color combinations is unreliable for me, so I have to weave a few colors together in a pattern to see if it is something I like and/or something that goes well together. I can guess that a dark base and a bright color will look nice as a box knot keychain, but I only see it once it is built.
Cheap cord behaves differently under tension, holds less shape and finishes poorly. Denser, stiffer cord costs more and is worth it. The pattern and the material are inseparable; the same knot in different cord produces a different object. Some of the cheaper cords melt away or even burn.
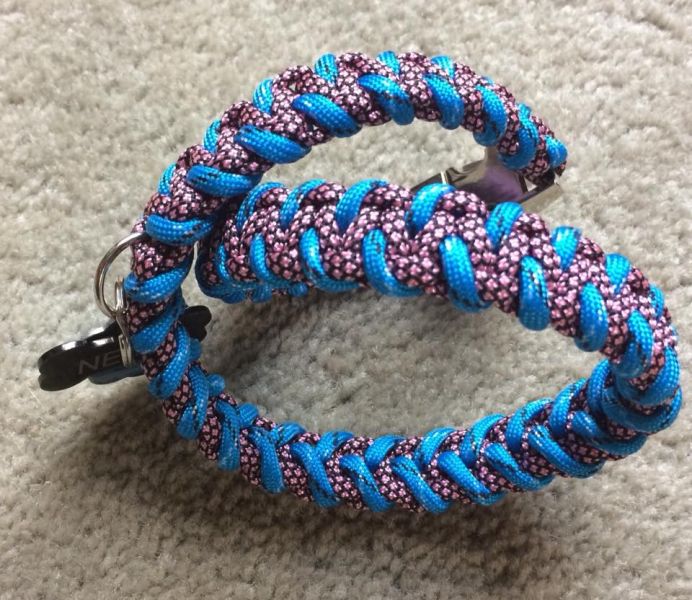
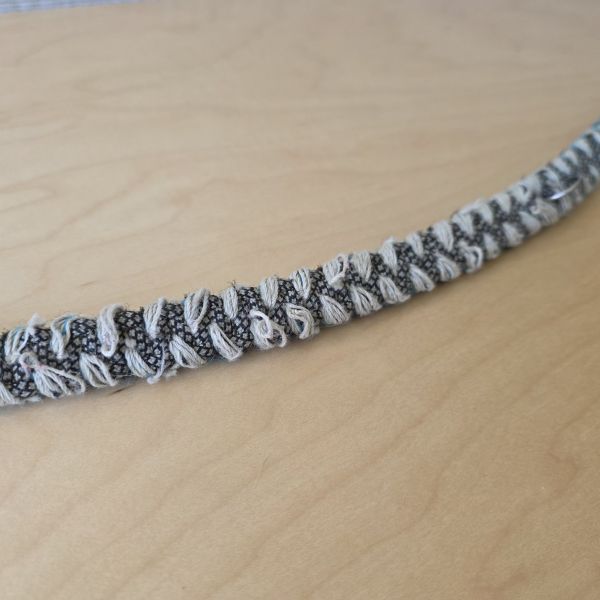
The photo below shows this directly. Nemo wore his collar through years of grass rolling, snow and daily life until the blue outer cord wore completely away while the pink and black diamond inner cord held its structure, still as tight as the day it was made. Two cords in the same weave, same tension, same use, with a much different wear rate. That difference comes down to material quality and how each cord was constructed. The weave itself never failed. The surface did. Nemo's collar only got replaced because his neck got thicker and his original collar was too tight.
The weakest point of most paracord work is usually the end finish. Melting is inconsistent. Glue requires practice. The right finish for a given pattern and material is a design decision, not an afterthought. Solve it before starting the piece, not after. Some patterns end on a solid knot that can be tightened before melting, some do not.
Every knot affects the next one. Uneven tension in the first third of a piece will show clearly by the last third. There is no correcting it mid-build without losing the work. Consistent pressure from the first knot is not optional; it is the technique. Some patterns are more unforgiving visually than others, but you can always untie the rows and fix before you are finished. Sometimes making mistakes is the best way to learn and improve your skills.
Paracord does not stretch. Once a collar or bracelet is built to a length, that is its length. Getting the size right before starting is not optional; there is no easing it out afterward. For dog collars, measure the neck and add enough room for two to three fingers to slide comfortably underneath. Too tight is a welfare issue. Too loose and the collar slips off, which defeats the purpose entirely.
For bracelets and human wear, comfort preference varies more than most makers expect. Some people want a snug fit. Others want something loose enough to move freely on the wrist. Some find anything that shifts and slides distracting to the point of removing it. Ask before building, get a reliable measurement and build to it. A bracelet that sits in a drawer because it doesn't feel right is a wasted piece regardless of how well it's made.
Dogs also change over time. A collar sized for a young dog may not fit the same dog a few years later, especially if weight changes with age. A paracord collar cannot be let out or taken in. If the fit changes, a new collar is the only option. It's worth keeping that in mind when building for a dog that's still growing or one whose weight fluctuates seasonally.
Salvaged cable, mouse wire, USB and Apple charge cables, behaves nothing like paracord. It doesn't compress, doesn't grip itself and can't be heat-finished. The knot logic transfers; the execution does not. Treat cable work as a separate craft that borrows paracord pattern knowledge. The wire chain link keychains in the experiment set are the clearest demonstration: same pattern, unrecognizable material behavior. The result is its own object.
A pattern that reads beautifully at collar length may be unreadable at keychain length. A weave that works at bracelet scale may look thin and tentative on a leash handle. Test pattern choice at the target scale before investing full length of cord in the piece.
The keychain format exists as a testing ground as much as a finished object. Short length, low cord cost, fast to complete; it's the right scale for trying a new pattern, a different material or an unfamiliar hardware connection without committing full cord to a piece that might not work. The discipline is to change only one variable per build: same weave, different cord; same cord, different hardware; same hardware, different color. The experimental keychain set, wire chain link, alligator clip, brass ring and standard key ring, each changed exactly one thing. Each taught exactly one thing.
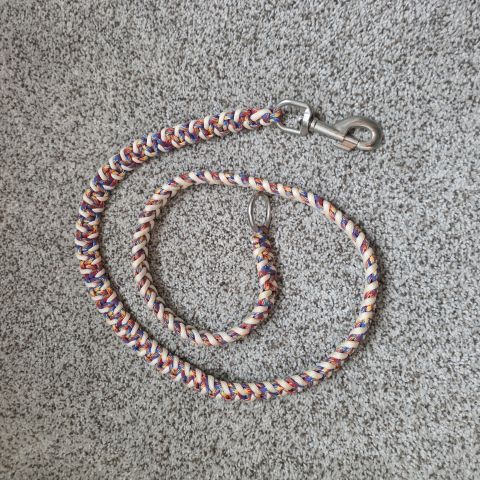
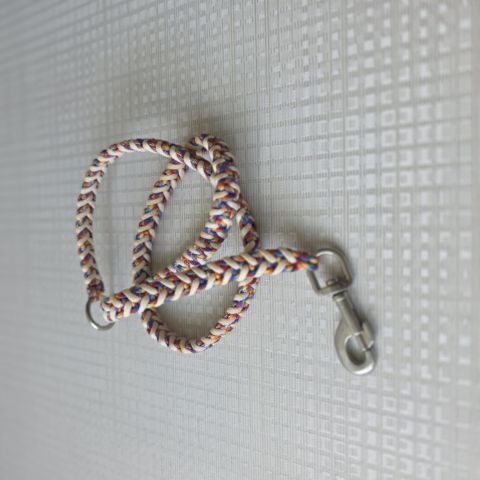
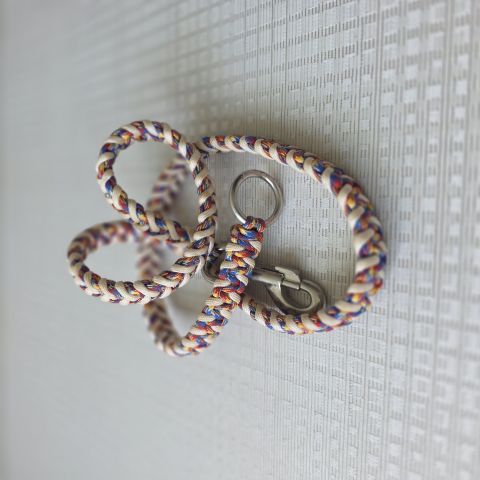
The leash was the longest build in the set: more cord, more time, a regular cobra weave with a white accent (bite) that produced a consistent profile on a much longer scale. The result looks right. The hardware is solid. It hangs in the dog room with the other leashes because it belongs there visually. It is a little too short for a walking leash or used as a waist tether. I did not really think about how to connect the leash to a dog or human before I built this item, I was just challenging myself with a long build. A nice handle, rounded box knot or a salvaged leash handle, could work. The lesson isn't that the build failed; it's that the use case wasn't fully defined before the cord was cut. Define the end use first, then build to it. Working in the other direction produces beautiful objects that don't quite fit anywhere.
My first paracord creation was in early 2017 (or perhaps late 2016, who can honestly remember). Most of the items shown here were created in '17 or '18. A few collars were done as needed, but I basically stepped away from creating anything for a while. Our dogs still wore there individual collars and I always smiled when someone commented about how pretty and/or unique they looked. Recently I was pulled back into creating something with all the materials I have and I realized as I was experimenting with different patterns, it can be kind of a theraputic process. I am reminded of my mom knitting and crocheting, creating something to be used, but also a relaxing activity. There is a calming symphony going on as one gets into the groove of the pattern.
Paracord work is hands on creating, that requires some techniques, lots of practice, a few simple tools and the abilty to repeat a pattern over and over. In the end, you produce something physical and finite, unique and perhaps stunning. In a context where so much creative output is now digital and infinitely reproducible, there's something grounding about making objects that exist once, in one place, at one particular tension.
The gift keychains went to real people, the collars went on real dogs and the bracelets worn by individuals. All appreciated in different ways. The work doesn't need to be explained to be functional. But explanation, knowing what went into it, adds a layer that functional objects don't usually carry.
More patterns are worth learning. The diamond knot finish is on the list. The wrapture double DNA weave is on the list. The circle stitch crown is on the list. Maybe version 2 of the dog leash with a crown sinet style box knot handle. The list stays longer than the time available, which is probably the right condition for staying interested.
Built in cord. Finished on purpose.
Questions about pattern, color choices, material sourcing or commissioning a piece; reach out directly.
Send a message